Custom UITableViewCell from nib in Swift
With Swift 5 and iOS 12.2, you should try the following code in order to solve your problem:
CustomCell.swift
import UIKit

class CustomCell: UITableViewCell {

    // Link those IBOutlets with the UILabels in your .XIB file
    @IBOutlet weak var middleLabel: UILabel!
    @IBOutlet weak var leftLabel: UILabel!
    @IBOutlet weak var rightLabel: UILabel!

}
TableViewController.swift
import UIKit

class TableViewController: UITableViewController {

    let items = ["Item 1", "Item2", "Item3", "Item4"]

    override func viewDidLoad() {
        super.viewDidLoad()
        tableView.register(UINib(nibName: "CustomCell", bundle: nil), forCellReuseIdentifier: "CustomCell")
    }

    // MARK: - UITableViewDataSource

    override func tableView(_ tableView: UITableView, numberOfRowsInSection section: Int) -> Int {
        return items.count
    }

    override func tableView(_ tableView: UITableView, cellForRowAt indexPath: IndexPath) -> UITableViewCell {
        let cell = tableView.dequeueReusableCell(withIdentifier: "CustomCell", for: indexPath) as! CustomCell

        cell.middleLabel.text = items[indexPath.row]
        cell.leftLabel.text = items[indexPath.row]
        cell.rightLabel.text = items[indexPath.row]

        return cell
    }

}
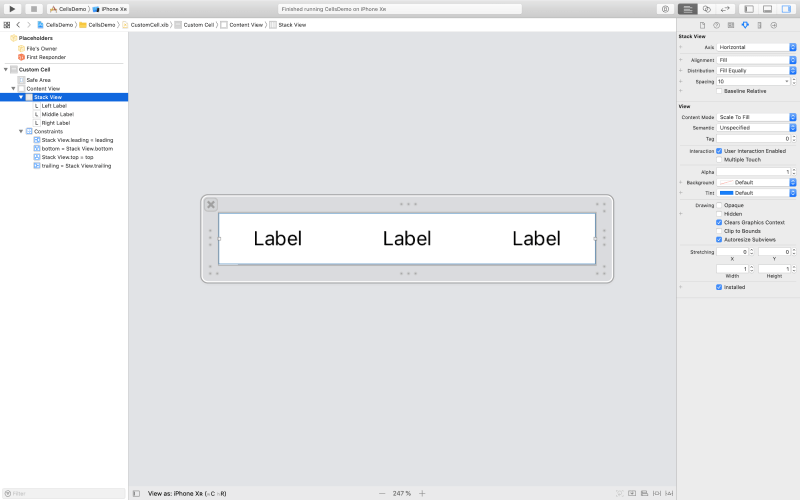
The image below shows a set of constraints that work with the provided code without any constraints ambiguity message from Xcode:
How to resize custom UITableViewCell nib file to fit tableView?
So, a couple of things I see. Firstly, it looks like your cell nib could use some AutoLayout constraints. Your nib is probably something like a 320px width. At run time, your cell's content view is actually stretching out to fill the new width of a larger device, but the green views that you placed are just staying put in their 320px configuration. You could test this by changing the color of the content view and seeing that color appear in the simulator. I sorta reproduced your cell here:

The pink view has a fixed width and is placed up against the top, left, and bottom of the content view. The blue view is 4 points to the right of the pink view to give that white margin in the middle. It is placed up against the top, right, and bottom of the content view. So as the cell's content view resizes, the AutoLayout constraints will stretch the blue view such that its right edge stays flush against the right edge of the content view.
For the edge insets, firstly set the edge insets on the table and on each cell. You can do that in the storyboard/nib or like this in code:
class ViewController: UITableViewController {

    override func viewDidLoad() {
        super.viewDidLoad()

        let nib = UINib(nibName: "yubnub", bundle: nil)
        tableView.registerNib(nib, forCellReuseIdentifier: "yub")

        tableView.separatorInset = UIEdgeInsets.zero
        tableView.layoutMargins = UIEdgeInsets.zero
    }


    override func tableView(tableView: UITableView, numberOfRowsInSection section: Int) -> Int {

        return 10
    }

    override func tableView(tableView: UITableView, cellForRowAtIndexPath indexPath: NSIndexPath) -> UITableViewCell {

        return tableView.dequeueReusableCellWithIdentifier("yub", forIndexPath: indexPath)
    }

    override func tableView(tableView: UITableView, willDisplayCell cell: UITableViewCell, forRowAtIndexPath indexPath: NSIndexPath) {

        cell.layoutMargins = UIEdgeInsets.zero
    }
}
Loading a Custom UITableViewCell from nib to a UIViewController in Swift
You can just register your SkillsViewCell in your SkillsViewController
Obj C
-(void)viewDidLoad {
   [super viewDidLoad];
   UINib *cellNib = [UINib nibWithNibName:@"NibName" bundle:nil];
   [self.skillsTable registerNib:cellNib forCellReuseIdentifier:textCellIdentifier];
}
Swift 2
override func viewDidLoad() {
   super.viewDidLoad()
   let nibName = UINib(nibName: "NibName", bundle:nil)
   self.skillsTable.registerNib(nibName, forCellReuseIdentifier: textCellIdentifier)
}
Swift 4
override func viewDidLoad() {
   super.viewDidLoad()
   let nibName = UINib(nibName: "NibName", bundle:nil)
   self.skillsTable.register(nibName, forCellReuseIdentifier: textCellIdentifier)
}
Then only inherit from UIViewController not UITableViewController
To call methods specific to your custom cell
func tableView(tableView: UITableView, cellForRowAtIndexPath indexPath: NSIndexPath) -> UITableViewCell {
    let cell = tableView.dequeueReusableCellWithIdentifier(textCellIdentifier, forIndexPath: indexPath) as! SkillViewCell

    cell.skillName.text = "Some text"
    cell.skillRank.text = "Some text"
    return cell
}
Load UITableView from nib into ViewController
you need to register the cell in tableview then you can use as normal.
let nib = UINib(nibName: String(describing: yourNibCellClass.self), bundle: nil)
tableView.register(nib, forCellReuseIdentifier: "yourNibCellIdentifier")
Init custom UITableViewCell from nib without dequeueReusableCellWithIdentifier
I'm inferring from the discussion in comments elsewhere that the reason you want to not allow cells to be dequeued and reused is that you're having trouble keeping track of user input captured in the cells.
The bottom line is that you really should allow the cells to be dequeued and reused and just handle that appropriately. If you're having problems with cells being reused, this can be resolved by separating the “model” (i.e. your data) from the “view” (i.e., the UIKit controls). This is the spirit of the model-view-controller pattern, but is true in any of those patterns that have separation of concerns (e.g., MVVP, MVP, etc.).
The key is that as values change in the cell, your cell should immediately tell the view controller so that the view controller can update the model immediately. Then, when the view controller needs to later do something with the value associated with a particular row, it doesn't retrieve it from the cell, but rather from its own model.
So, I might define a protocol for the cell to inform the table view that its text field changed:
protocol CustomCellDelegate: class {
    func cell(_ cell: CustomCell, didUpdateTextField textField: UITextField)
}
And I'd then define a cell class that called that delegate:
class CustomCell: UITableViewCell {
    weak var delegate: CustomCellDelegate?

    @IBOutlet weak var customTextField: UITextField!          // hook up outlet to this property in IB

    @IBAction func didChangeValue(_ sender: UITextField) {      // hook up "editing changed" action for the text field to this method in IB
        delegate?.cell(self, didUpdateTextField: sender)
    }
}
Now, the view controller will:
- register the reuse identifier with the NIB in question;
- in
cellForRowAt, populate the text field and specify itself as the delegate for that cell; and - handle the
didUpdateTextFieldmethod to update model if user changes anything.
Thus, something like:
class ViewController: UITableViewController {

    var values = ["One", "Two", "Three"]  // some initial values

    private let cellIdentifier = "CustomCell"

    override func viewDidLoad() {
        super.viewDidLoad()

        // if you’re using NIBs, you register them.
        // obviously if using prototype cells in your storyboard, this isn’t necessary.

        tableView.register(UINib(nibName: "CustomCell", bundle: nil), forCellReuseIdentifier: cellIdentifier) // or use cell prototype with storyboard identifer specified
    }
}

// MARK: - UITableViewDataSource

extension ViewController {

    override func tableView(_ tableView: UITableView, numberOfRowsInSection section: Int) -> Int {
        return values.count
    }

    override func tableView(_ tableView: UITableView, cellForRowAt indexPath: IndexPath) -> UITableViewCell {
        let cell = tableView.dequeueReusableCell(withIdentifier: cellIdentifier, for: indexPath) as! CustomCell

        // populate cell and specify delegate

        cell.delegate = self
        cell.customTextField.text = values[indexPath.row]

        return cell
    }
}

// MARK: - CustomCellDelegate

extension ViewController: CustomCellDelegate {
    func cell(_ cell: CustomCell, didUpdateTextField textField: UITextField) {
        // when the cell tells us that its text field's value changed, update our own model

        if let indexPath = tableView.indexPath(for: cell), let string = textField.text {
            values[indexPath.row] = string
        }
    }
}
Many people might be inclined to simplify this further, by hooking the IBAction for the text field directly to a view controller method. That works, and eliminates the need for this protocol, but the problem is that you need to figure out with which row this particular UIKit control is associated. The common trick is to navigate up the view hierarchy to identify the appropriate cell (e.g. often the text field will be in a content view within the cell, so you grab textField.superview.superview as! UITableViewCell), but that feels a little fragile to me.
But regardless of this little detail, hopefully this illustrates the broader pattern. Rather than trying to have cells keep track of user input, you should have the cell (the “view”) update the controller of any data changes immediately, and the view controller then updates the model immediately, and you no longer need to worry about the cell reuse optimizations that iOS employs.
For Swift 2 renditions, see previous revision of this answer.
ERROR : registering a custom tableView cell in swift with an xib file
You are registered your nib with ( :forCellWithReuseIdentifier) but your need to register your nib with ( : forCellReuseIdentifier). Please change your register line with this.
storeInfoTable.register(UINib(nibName: "CustomStoreInfoTableOneViewCell", bundle: nil), forCellReuseIdentifier: "storeinfocell1")
How do you load custom UITableViewCells from Xib files?
Here are two methods which the original author states was recommended by an IB engineer.
See the actual post for more details. I prefer method #2 as it seems simpler.
Method #1:
- (UITableViewCell *)tableView:(UITableView *)tableView cellForRowAtIndexPath:(NSIndexPath *)indexPath {
    UITableViewCell *cell = [tableView dequeueReusableCellWithIdentifier:@"BDCustomCell"];
    if (cell == nil) {
        // Create a temporary UIViewController to instantiate the custom cell.
        UIViewController *temporaryController = [[UIViewController alloc] initWithNibName:@"BDCustomCell" bundle:nil];
        // Grab a pointer to the custom cell.
        cell = (BDCustomCell *)temporaryController.view;
        [[cell retain] autorelease];
        // Release the temporary UIViewController.
        [temporaryController release];
    }

    return cell;
}
Method #2:
- (UITableViewCell *)tableView:(UITableView *)tableView cellForRowAtIndexPath:(NSIndexPath *)indexPath {
    UITableViewCell *cell = [tableView dequeueReusableCellWithIdentifier:@"BDCustomCell"];
    if (cell == nil) {
        // Load the top-level objects from the custom cell XIB.
        NSArray *topLevelObjects = [[NSBundle mainBundle] loadNibNamed:@"BDCustomCell" owner:self options:nil];
        // Grab a pointer to the first object (presumably the custom cell, as that's all the XIB should contain).
        cell = [topLevelObjects objectAtIndex:0];
    }

    return cell;
}
Update (2014):
Method #2 is still valid but there is no documentation for it anymore. It used to be in the official docs but is now removed in favor of storyboards.
I posted a working example on Github:
https://github.com/bentford/NibTableCellExample
edit for Swift 4.2
override func viewDidLoad() {
    super.viewDidLoad()

    // Do any additional setup after loading the view.
    self.tblContacts.register(UINib(nibName: CellNames.ContactsCell, bundle: nil), forCellReuseIdentifier: MyIdentifier)
}

func tableView(_ tableView: UITableView, cellForRowAt indexPath: IndexPath) -> UITableViewCell {

    let cell = tableView.dequeueReusableCell(withIdentifier: MyIdentifier, for: indexPath) as! ContactsCell

    return cell
}
Related Topics
How to Input Currency Format on a Text Field (From Right to Left) Using Swift
Performselector May Cause a Leak Because Its Selector Is Unknown
How to Exit Iphone Application
How to Apply a Perspective Transform to a Uiview
How to Make Http Request in Swift
How to Debug Memory Leaks When Leaks Instrument Does Not Show Them
How to Set Cornerradius For Only Top-Left and Top-Right Corner of a Uiview
Nsurlsession/Nsurlconnection Http Load Failed on iOS 9
Evenly Space Multiple Views Within a Container View
How to Force a Uiviewcontroller to Portrait Orientation in iOS 6
How to Enable Native Resolution For Apps on Iphone 6 and 6 Plus
Opening the Settings App from Another App
How to Hide Google Maps Location Dot